
The LUMIX G95 features a host of functions for shooting photos and videos in various situations with excellent mobility. Unlimited 4K 30p video recording plus pre-installed VLOG L expands creative options. Additionally, it features high-speed video recording at 60, 90, 120 fps and a microphone/headphone jack. For Windows 10 users with the professional NLE software – Premiere Pro, before starting the posting workflow of Lumix G95 4K MP4 and Full HD AVCHD with Premiere Pro (CC, CS6, CS5), you may have the following 2 questions to ask?
1. How about the media compatibility of Lumix G95 4K MP4 with Premiere Pro CC?
2. How to Import Panasonic Lumix G95 1080P AVCHD to Premiere Pro CS6
3. Is MPEG-4 is the best codec that gives the highest quality and best performance to work with Premiere Pro?
For those pepole who have the same questions listed above, you’ve come to the right place, the following part will illustrate those 2 issues to you with detailed information.
1. Media compatibility of Lumix G95 4K with Premiere Pro
Premiere Pro CC 2019 (13.1) supports both 4K MP4 and MXF, it also means that to import Lumix G95 4K MP4 media, you will need to update to 13.1 or later version. While Premiere Pro CC 2015 and earlier only supports Panasonic Full HD MP4.
2. How to Import Lumix G95 4K MP4 to Premiere Pro later version?
Before importing Lumix G95 footage into Premiere Pro for editing, verify that Pro Video Formats is installed on your system. Check for software updates, if necessary, install the latest Pro Video Formats. No additional software is required.
3. Is MPEG-4 is the best codec for Premiere Pro high quality and high performance editing?
The 4K MP4 video shot with Lumix G95 uses a Long GOP recording type, which refers to the fact that several P- and B-frames are used between I-frame intervals. Longer GOP lengths encode video more efficiently by reducing the number of I-frames but are less desirable during short-duration effects such as fast transitions or quick camera pans.
For people who wish to get a high quality and high editing performance of Lumix G95 4K video with Premiere Pro, we highly recommend you to encode 4K MPEG-4 to H.264. Compare with 4K MOV format, H.264 codec can retain high quality while still require much less expensive disk systems. In addition, as an Intra-frame-only codec, H.26 is much simpler to decode than other distribution-oriented formats like MPEG-2.
Export H.264 from Sony Lumix G95 4K MP4 video
If you are looking for a professional application to produce H.264 codec, you can’t miss our professional 4K Video Converter – Acrok Video Converter Ultimate. The program has perfect importing support for the 4K MPEG-4 video with the Lumix G95. Thanks to its batch conversion mode, you can load multiple video into the application at one time for conversion to save your precious time.
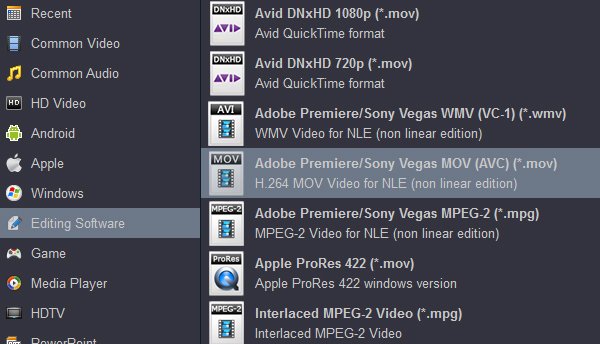
The application can assist you to transcode Lumix G95 4K MPEG-4 to Premiere Pro most favorable codec in various different types including “Adobe Premiere AVC(*.mov)”, ” Adobe Premiere MPEG-2(*.mpg)”, etc. Acrok software has perfect compatibility with the new Windows 10, therefore, feel free to install and download the application even if you’ve upgraded to the newest system.
Free download Lumix G95 4K Video Converter


How to convert Lumix G95 videos for Premiere Pro Editing?
Step 1: Import Lumix G95 footage.
From “File” drop-down option to add Lumix G95 4K MP4 or 1080P AVCHD (.mts) video files into the top 4K Video Converter.
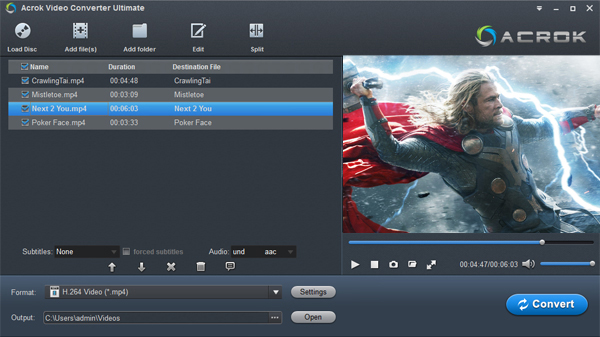
Step 2: Choose output file format.
From “Format” bar drop-down list, choose Premiere Pro best favorable H.264 editing codec.
Step 3: Edit Lumix G95 4K videos(Optional).
By default the Edit icon is grayed out. To activate the Edit menu, you have to select an item first. When a video or movie is selected, click the pencil like Edit icon on the left top tool bar to open the video editor window, here, you can play and preview the original video and output effects. Also you can flip or rotate video, trim, crop, add watermark, apply special effect, edit audio or insert external subtitle.
Step 4: Start the conversion process.
After all the settings is over, go back to the main interface and hit right-bottom “Convert” button to start to convert Lumix G95 video to Premiere Pro best compatible format. When the conversion is completed, launch Premiere Pro on your PC to import converted video to it for smooth editing workflow on either fast or slow computer.

One response
I like its batch convertion function. When the convertion starts, I can go out for a walk and get what I want when I come back.