How to edit Panasonic AJ-CX4000 4K HEVC Video in Premiere Pro Without Importing, Choppy, Lagging Issues? You can use Acrok Video Converter Ultiamte to solve these problems. By converting HEVC to Premiere Pro native editing format and codec, everything will be fine.
More and more phones and prosumer cameras shoot videos at 4K. And as ultra-high definition video, bitrate of 4K videos is also larger than 480P/ 720P/ 1080P recordings. HEVC video codec is much more efficient than H.264 when it comes to compress videos for saving space and reducing the pressure of bandwidth while data transferring. Thus, most of the 4K videos are compressed in HEVC codec. However, editing Panasonic AJ-CX4000 4K 4K HEVC videos isn’t an easy thing. Even those users who work with the professional Premiere Pro are reporting various problems, such as getting codec missing or unavailable while importing Panasonic AJ-CX4000 4K videos and choppy or lagging 4K video playback after importing. To edit Panasonic AJ-CX4000 4K videos in Premiere Pro CC, CS6 and CS5 without encountering those issues, we need to transcode HEVC videos to avoid codec incompatibility issue and compress 4K or create proxy for smooth and fast editing.
How to Edit Panasonic AJ-CX4000 4K Video in Adobe Premiere Pro – Step 1. Solve Premiere Not Import HEVC Issue
Adobe Premiere Pro CC does support to import and export HEVC 4K videos. However, this doesn’t mean that all HEVC 4K videos can be imported into Premiere without errors. For that reason, many Premiere Pro users can’t import Panasonic AJ-CX4000 4K HEVC videos and get ‘codec missing or unavailable’ error message instead.
So to edit Panasonic AJ-CX4000 videos in Adobe Premiere Pro, the first thing is to fix HEVC not importing issue. And the easiest and most efficient solution is to transcode HEVC videos to Premiere Pro fully compatible format using Acrok Video Converter Ultimate.
Acrok Video Converter Ultimate – Transcode 4K HEVC Video to other Premiere Pro Friendly 4K Formats
- Convert all 4K HEVC video wrapped MP4, AVI, and MKV to Premiere Pro compatible 4K formats
- Provide super fast transcoding speed by enabling full GPU hardware acceleration.
- Also allow users to tweak resolution, bit rate, and other parameters.
- Also integrated with editing features: cut, crop, merge, stabilize, filter…
After downloading and installing Acrok Video Converter Ultimate on your computer, you can start transcoding Panasonic AJ-CX4000 videos for Premiere Pro.


Step 1. Open Acrok Video Converter Ultimate and load the source Panasonic AJ-CX4000 video into this HEVC to Premiere Pro Covnerter: Click Add file icon to load the source file. Tips: You can load multiple files at once for batch transcoding.
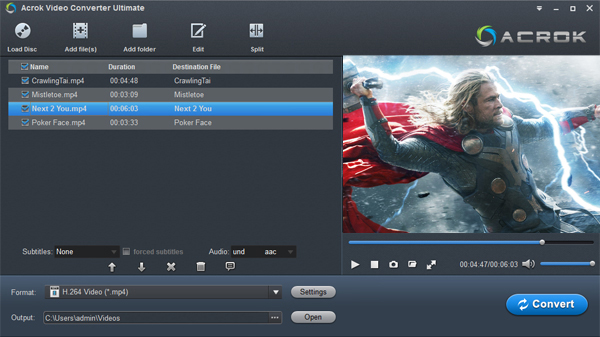
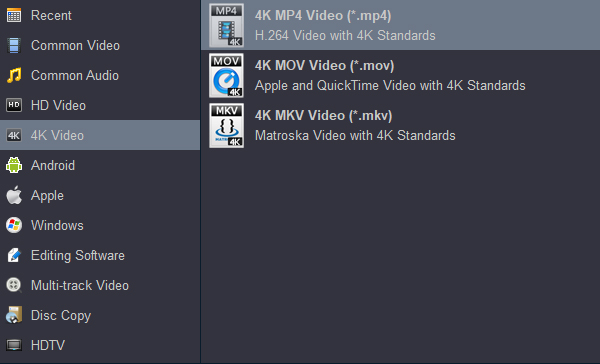
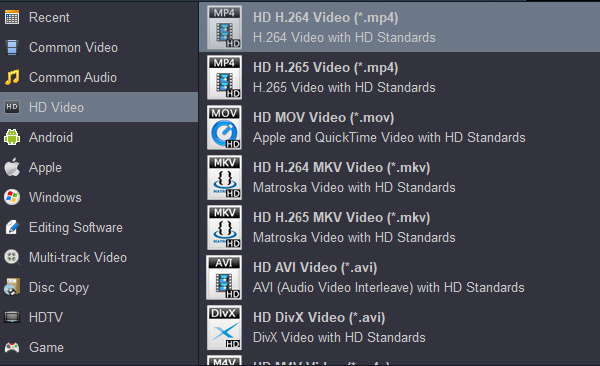
Step 2. Select output format: go to the Format tab at the bottom of the window and choose an output format that Premiere can accept, for example 4K H.264.
Step 3. Begin transcoding: simply hit Convert button and then it will start transcoding with the assistance of hardware acceleration if supported and enabled.
How to Edit 4K HEVC Video in Adobe Premiere Pro – Step 2. Solve 4K Editing Not Smooth Issue
After fixing HEVC incompatible with Premiere issue, we may still discover that it is hard to get 4K video editing run smoothly. It may be lagging, choppy, jittery or unresponsive, and even causes Premiere crashing. The reason for such kind of problem is probably that the computer is too weak to work with strictness Panasonic AJ-CX4000 4K footage. Working with Panasonic AJ-CX4000 4k content requires for fast CPU, fast GPU, a lot RAM, a large SSD, and more.
To edit Panasonic AJ-CX4000 4K video on a relative budge ($1,100), you can build your computer with
CPU: Intel i7-9700K
Graphics Card: GTX 1050 Ti
Motherboard: MSI Z390-A Pro
RAM: 16GB DDR4
Storage 1: 500GB Crucial MX500 SSD
Storage 2: 2TB Seagate HDD
Power Supply: SeaSonic G-650
CPU Cooler: Cryorig H7
Case: Fractal Define R5
Operating System: Windows 10
If you’re currently not planning to make the upgrade, how can you edit Panasonic AJ-CX4000 4K videos in Adobe Premiere Pro smoothly? Here’re two solutions: 1) Downscale 4k video to 1080p by using Acrok software. 2) Create proxies video in Premiere.
Solution 1. Compress Panasonic AJ-CX4000 4K to 1080p for later editing.
Sometimes there’s unnecessary to keep videos in 4K. In this case, we can compress 4K to 1080p to reduce the strain on your computer during editing. This process is easy and can be quickly done with the help of hardware-accelerated Acrok Video Converter Ultimate which we have mentioned above. If you haven’t yet convert HEVC for Premiere, you can convert and compress 4K HEVC videos at one go.
Step 1. Load 4K source: open Acrok Video Converter Ultimate, click Add File in the pop-up window to import target 4K video.
Step 2. Select output and set resolution to 1080p: click the Video tab and choose an Adobe Premiere Pro compatible format, and then double click on it or click the small gear icon in the preset to get access to a new panel where you can set the resolution to 1080p or other desired resolution.
Step 3. Start 4K to 1080p: click Covnert button to begin converting and compressing.
Once finished, you will find that you can import the 1080p files to Adobe Premiere Pro for smooth editing.
Solution 2. Create proxy for 4K editing.
Creating proxy is to create a low-resolution copy of your original video, and then you can use the low-quality proxy file during the editing process. This way, the editing process will be smoother. When you finish editing and are ready to export, you just need to replace the proxy file with its corresponding original file. For example, you can create a copy in 1080×720 for your 4K video, edit in Premiere Pro using the 720p file, and then export in 4K.
So how to create proxy file for 4K editing in Premiere Pro?
Step 1. Create a new project, and then click Ingest Settings tab. Then, you need to check the box of Ingest and choose Create Proxies from the drop-down menu. Next, choose a premade proxy preset or create a custom one. Below are the recommended resolutions and formats for two 4K resolutions.
UHD(4K) 3,840×2160:
▪ Recommended proxy resolution: 960×540 (1/4 size of full res) or 1280×720 (1/3 of resolution)
▪ Format: H.264 or Cineform
“Cinema” 4K 4,096 x 2160:
▪ Recommended proxy resolution 1024×540 (1/4 size of full res)
▪ Format: H.264 or Cineform
After that, we also need to set proxy destination. We can set it to same as project. Now, click OK and the project is ready to create proxy file for 4K editing.
Step 2. Go to Media Browser and add your 4K footage. Then Adobe Media Encoder will automatically pop up and begin creating proxy file for your footage. This will take a little bit long time to transcode your 4K videos to a lower resolution substitute.
Step 3. Go to program monitor and head over to the plus sign button at the bottom right corner of the program monitor. Then find Toggle Proxies and drag it into your buttons bar. When you press the button and highlight it blue, your project will start editing with the proxy file instead of the original 4K video.
Step 4. After finishing editing and planning to export, you should switch to the original 4K file.
So, above is the guide on how to smoothly edit Panasonic AJ-CX4000 HEVC/H.265 videos in Adobe Premiere Pro. You can choose a solution based on your own needs.

No responses yet